Battle of Camden: False Hope
By Vernon E. Yates / Robert Shawlinski
Introduction
 With the fighting in the North at a stalemate during the revolt, the British needed a change and direction, this slowly begin to take shape in London. This change of policy called for the British to become more mobile and to use its littoral advantages over the rebels. The British decided that they would leave the troublesome New England Colonies for the vast plantation grounds of the South. This new strategy pushed from London came in the form of the Secretary of State for America, Lord George Germain. Lord Germain faced calls for his resignation and the prospect of falling out of favor with King George III. He had to put down the rebels’ revolt and check the rising cost of the conflict by moving South to conduct operations.
This planned move to the South appeared on paper to be an excellent decision to recalibrate the British war effort. The main target would be Charleston with its deep-sea harbor for the Royal Navy and the resupply for the troops. Controlling the harbor city of Charleston also gave the British the ability to attack French interests in the Caribbean.
This work will analyze the Battle of Camden and its role it played in giving false hope to the British. The lens for this analysis of the Battle of Camden will use the setting, forces, sequence of events, the battle, and conclusions. This analysis will show how the Battle of Camden gave the British “False Hope”.
Strategic Setting
The British understood that operations against the rebels in the Northern Colonies had stalled despite victories over the rebels. Their attempt to encircle New England and block this area from other colonies had not worked as they had hoped it would. The cost of the war in the colonies skyrocketed in money and blood for the Crown bringing pressure on the cabinet members to try different approaches to win. The British not only were fighting a war in the colonies they also had to safeguard against any attacks coming from the South by the French and the Spanish. These potential threats from outsiders could only aid the rebels’ efforts.
The British had already tried once before to subdue parts of their Southern Colonies with earlier attacks on the important harbor town of Charleston in 1776. This attempt on Charleston caused much embarrassment on the British for their failure to conduct a successful joint littoral attack.[1] Nothing during these amphibious operations seemed to go as planned for the British. The Royal Navy was late leaving Boston and the following ships sailed into a storm, which delayed operations. Once they did arrive at Charlestown, the lack of understanding of the environment began to show as several ships ran aground on the sand bars that surround the harbor approaches. Making matters worse, the local forts on Sullivan Island continued to exchange artillery fires with the British. This first attempt at capturing Charleston became a stalemate forcing the British to abandon their plans for the theater in the South.
Forces at Charleston
It had been three years since the British first failed to capture the town of Charlestown and their position seemed just as unattainable. However, Lord Germain pushed for a new approach and strategy to deal with revolting colonists. No longer would the main target be the troublemakers around Boston. Despite the previous failed attempts to capture Charleston, the British again went with General Henry Clinton, the same commander from the previous failed attempt at Charleston.[2] However, Clinton did formulate better working conditions with the Royal Navy allowing for the synchronization of operations for ship to shore movements and naval gunfire. General Charles Cornwallis accompanied Clinton in the role as his second in command with thousands of troops in support.
During this second attempt, the British were faced Rebel Commander Benjamin Lincoln in the role of defender of Charleston. Even though General George Washington had sent Lincoln personally, he could not hold back the power of the British Empire. Lincoln also had serious conflicts with the civilian rebel government that demanded that he not retreat from Charleston as end neared for the Rebels. It would not have looked positive on Lincoln if the government that pledged to defend them from the King’s Soldiers suddenly abandon them. During the time wasted dealing with civil military opposing views, the British were not idle in their siege of Charleston.[3]
Sequence of Events
The previous strong fortification of Fort Sullivan that had halted the first attempt at capturing the harbor now stood as neglected ruins. The fort could no longer stop the British from moving closer to pound the rebel garrison. Further aiding the effort in attacking Charleston came in the better understanding of the deadly sand bars that encircled the approaches to the harbor. The Royal Navy also put its lessons learned in their ship to shore movements of troops that quickly encircled the town.[4]
After on and off again talks by Lincoln to save his command of the embarrassment of a total surrender with no honors of war furthered delayed the inevitable. Lincoln might have saved his formation if he had disregarded the civilian government’s concerns and tactically retreated from the area to a better defensive position. Instead, he became a prisoner of the British along with the rest of his men.
The surrender of Charleston by the Americans resulted in large numbers of men, arms, and supplies falling into the hands of the British. Large numbers of men became guests at prison camps and no longer posed a threat to the Crown. With the threat of armed men being removed from the battlefield, it appeared that the British strategy of divide and conquest could begin to take shape in the Carolinas.
After seizing Charleston Clinton through a Proclamation declared at the time, only Continental troops would serve out their time in prisons because they posed more of a threat than the militia. Clinton needed the militia members to go home and become loyal subjects to the Crown; he paroled the militia back to their homes.[5] With the condition, they must stay neutral and not take up arms against the British.[6] This action immediately drew strong condemnation from the loyalists and parts of the army for its leniency toward former fighters. The loyalists did not agree because they felt they suffered the most from the rebels. In addition, the opposing groups had a religious divide of sorts because the loyalists followed the teachings of the Church of England, and the rebel groups believe in the breakaway beliefs of Presbyterianism. The Crown considered this group a threat to the rule of law due to their rejection of authority of the King.[7]
Clinton further caused confusion by making another proclamation just before he left the theater of operations for New York. His latest proclamation called for the former rebels to join loyalist militia and defend the interest of the King. Just pledging to be neutral and sitting out the fighting would no longer work in the Carolinas. To add further insult, the rebels will be required to swear allegiance to the King. Ironically, this was the reason many of the Scot-Irish had left the realm previously and moved to the new world.
After causing much confusion due to his proclamations, Clinton redeployed back to New York leaving Cornwallis in charge of the theater of operations. This redeployment back to New York came about due to the potential threat of the French landing troops in the area in the New York area. Any combined joint operation against the British could spell defeat for them if they lost control of the harbor.
Before Clinton redeployed back to New York he left instructions for Cornwallis to secure Charleston as the base of operations as he moved into the interior to pacify and control the population. Cornwallis immediately went on offense after taking control of the command from Clinton.[8] His strategy centered on the assumption that he needed to control the main centers of population and create a safe atmosphere for potential loyalists to unite. Cornwallis executed his plan by ensuring the British had its allies control Camden and Ninety-Six posts. With the fall of Charleston, no opposition was able to muster and meet the British as they made these outposts secure for the King.
Despite the seemingly unstoppable force bearing down on the militias, small pockets of men were able to retreat out of the path.[9] These men left the battlefield and returned to their homes; this period gave the King’s forces some calm and a bit of false hope. Even though the fighting and resistance had slowed down there were still small rag tag groups of men that refused to pledge allegiance to the King.
The Battle
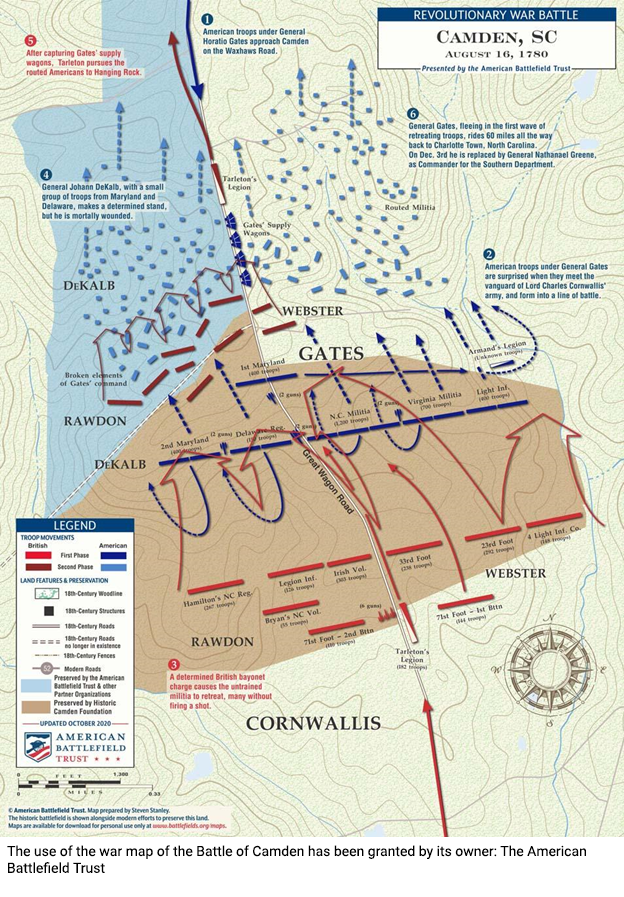 During the previous fighting at Charleston General Washington saw the need to send aid in the form of reinforcements to aid the besieged garrison. He picked the able General Johan De Kalb to lead the relief force to Charleston. De Kalb had previously served as Captain in the French and Indian War on the side of the French. Unlike many of the foreign officers serving under Washington that failed, De Kalb proved to be an able leader in hostile situations in previous fighting.
De Kalb and the Continentals made it as far as North Carolina and received news that Charleston had fallen to the British. While awaiting new orders on how to proceed De Kalb received news that his force would fall under the newly named General considered at the time to be the “Savior of Saratoga” General Horatio Gates.[10] Gates had previously received accolades for the victory of the British and stopping their thrust south. Gates also received notoriety for being slow to go on the offensive and preferred to fight from behind fortifications.
General Gates did not have the confidence of Washington and he did not receive his command from him instead he received his command directly from the Continental Congress. Congress had refused Washington’s choice of General Nathen Greene to lead the Southern Operations.[11]
As Gates begin to move south toward his objective of Camden; one of the forward bases that the British had already established to control the population. He felt confident that he would provide a complete victory over the British by surprising the garrison defending Camden. However, Gates had received outdated reports that Camden had a depleted force for the guard force guarding Camden due to militia attacks and disease. His formation slowly moved from North Carolina into South Carolina with no sense urgency. Gates immediately doomed the expedition and any chance of surprising the garrison guarding Camden by refusing to listen to militia leaders’ suggestions for the route to use. Gates picked the northwest route because it offered the fastest approach to Camden. This route also contained large settlements of loyalists that immediately reported their movements to the authorities. In addition, this route had very sandy soil that could just barely support food requirements for the inhabitants.
The chances of detection by hostile settlers would have been minimum if the western approach had been the route taken for the attack on Camden. This approach also had friendly settlements that could have offered real time information to the already out of touch Gates. To add misery the men marching with Gates were suffering from hunger and stomach ailments due to eating half cook food along the way. Gates’s Grand Army was moving toward Camden with a breakout of diarrhea.
Gates’s Grand Army had no local scouts forward when it had run into British pickets on the road to Camden. This force had already been under surveillance from Camden giving them plenty of time to react by sending a message to Cornwallis.[12] This potential danger posed by Gates led Cornwallis to assemble just over a thousand-man force from Charleston to confront the attackers. Gates might have been able to detect their approach if he had not detached two of his militia leaders Thomas “Game Cock” Sumter and Frances “Swamp Fox “to other less important missions. Gates continued to make mistakes by foolishly made a night march with his untrained militia, he arrived at the battlefield with exhausted men. He made another mistake by picking the site of the battle since it offered only one way to retreat due in part to the swamps surrounding the area. This mistake sealed the Grand Army to defeat.[13]
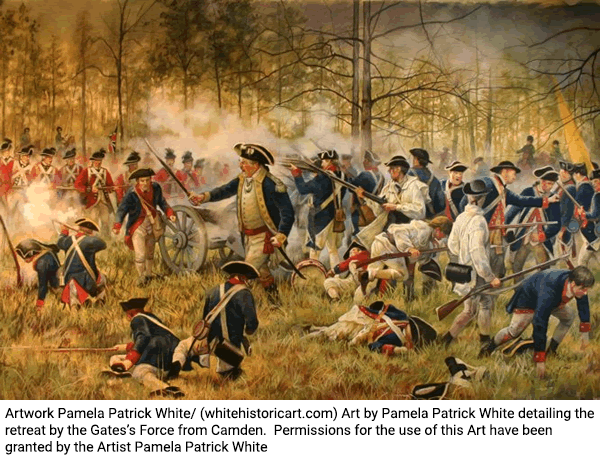
The placement of the troops by Gates of the battlefield seemed to be almost murder being committed against his on men. Because he placed his weaker militia troops on his left flank of his formation, the militias now faced the more experienced regulars of the British. Gates should have known that by placing his militia in that position they would be facing the strongest of the British. Gates should have understood this because he served previously in the British Army as Major before moving to the Colonies. As expected, the weaker militia troops manning the left flank quickly disintegrated and started retreating from the battlefield. This retreat caused Gates’s right flank to be in danger of collapsing due to the pressure on them by the British.[14] In an attempt to stop the annihilation, Gates ordered De Kalb and his Continentals forward to counterattack in hopes of saving the day. He did have some initial success in stopping the British; however, the events on the field overtook De Kalb. Further confusion came about due to Gates being not able to direct the battle from his position. He had placed himself too far back to control the battle and quickly lost touch with the events as they unfolded.
De Kalb and a small group of men continued to resist until they were overwhelmed in the fighting. He would die several days later of his wounds while a prisoner of the British.[15] Gates did not fall on the battlefield as a hero but retreated North toward North Carolina. He finally ended his retreat hundred-eighty miles north at the town of Hillsborough. At this place, Gates sent a message informing the Congress that had lost at Camden. In the area of Camden, the American Legion led by Banastre Tarleton begin hunting down the fleeing forces. Because Gates had detached his cavalry from the main effort at Camden, Tarleton faced no opposing mounted forces as he hunted the fleeing down.
Thomas Sumter as one of the detached militia leaders did manage to attack a baggage train moving north from Charleston. These events played no real role in the fighting of Camden because the battle had already ended in a victory for the British. As with many of the partisans, groups involved in the fighting this group lost track of the threat in the area and became mesmerized with their spoils of looted items. This allowed Tarleton and his unit to hunt them down and inflict serious casualties on the group. Sumter just missed capture by hiding in the adjacent wood line.
The Battle of Camden appeared to signal the end of the hostilities in South Carolina with Gates’s Grand Army destroyed just North of the town.[16] The countryside appeared pacified and ready to start the transition back to Royal Governor as its leaders. The British now had a blueprint that would enable them to take other parts of the colonies with North Carolina being the next target.
There were still deadly men that could still confront the British goals of reconquering their American lands. Like Marion and Sumter detached by Gates before the before fighting at Camden. This action proved to be a positive outcome for the cause of the Americans. While providing oversight on the road leading toward Charleston, Marion attacked a military train of the British. This attack allowed Marion to free several previous fighters of Camden that had been destined for prisons in Charleston. The other leader Sumter would never seek any peace because of the burning of his home by the British while making his invalid wheelchair bound wife and son watch as the home burned. The victory at Camden only gave the British a false hope for future operations.
Conclusion
As a result of the British having captured the town of Charleston during its second attempt which allowed for the British to establish forward bases to control the population. The previous reports said that Camden was weakened in its defense, providing the opportunity for the Rebels to move south toward the objective of Camden. Nonetheless, the lack of communication, assessment, and execution from the Continental Army demonstrated the superiority of the British forces that overtook the battlefield. The victory at the battle of Camden provided the British with a false hope of securing the South for the King.
| * * * |
Show Notes
| * * * |
© 2026 Vernon E. Yates / Robert Shawlinski
About the Authors
Vernon Yates is an Instructor at the United States Army Sergeants Major Academy in the Department of Army of Operations. He Holds a Master’s Degree from University of Texas at El Paso in Defense and Strategic Studies. Robert Shawlinski is an Assistant Professor at the United States Army Sergeants Major Academy in the Department of Army of Operations. He holds a M.Ed. in Education from Trident University in California. Both are retired Sergeants Major with a combined 55 years of service.
* Views expressed by contributors are their own and do not necessarily represent those of MilitaryHistoryOnline.com.

